지난 Part #1 에서는 기본적인 Redis 의 Scan 동작과 테이블에 대해서 알아보았습니다. 이번에는 Redis Scan의 동작을 더 분석하기 위해서 기본적으로 Redis Hash Table의 Rehash 과 그 상황에서 Scan이 어떻게 동작하는지 알아보도록 하겠습니다.
먼저, Redis Hash Table의 Rehashing에 대해서 알아보도록 하겠습니다. 전 편에서도 간단하게 언급했지만 Redis Hash Table은 보통 Dynamic Bucket 에 충돌은 list 로 처리하는 방식입니다.

처음에는 4개의 Bucket으로 진행하면 Hash 값에 bitmask를 씌워서 Hash Table 내의 index를 결정합니다. 그런데, 이대로 계속 데이터가 증가하면, 당연히 충돌이 많고, List가 길어지므로, 탐색 시간이 오래걸리게 되어서 문제가 발생합니다. Redis는 이를 해결하기 위해서 hash table의 사이즈를 2배로 늘리는 정책을 취합니다.

2배로 테이블이 늘어나면서, bitmask는 하나더 사용하도록 됩니다. 이렇게 테이블이 확장되면 Rehash를 하게 됩니다. 그래야만 검색시에 제대로 찾을 수 있기 때문입니다. 먼저 Table을 확장할 때 사용하는 것이 _dictExpandIfNeeded 합수입니다. dictIsRehashing는 이미 Rehash 중인지를 알려주는 함수이므로, Rehashing 중이면 이미 테이블이 확장된 상태이므로 그냥 DICT_OK를 리턴합니다.
먼저 hash table에서 hash table의 사용 정도가 dict_force_resize_ratio 값 보다 높으면 2배로 확장하게 됩니다.
/* Expand the hash table if needed */
static int _dictExpandIfNeeded(dict *d)
{
    /* Incremental rehashing already in progress. Return. */
    if (dictIsRehashing(d)) return DICT_OK;

    /* If the hash table is empty expand it to the initial size. */
    if (d->ht[0].size == 0) return dictExpand(d, DICT_HT_INITIAL_SIZE);

    /* If we reached the 1:1 ratio, and we are allowed to resize the hash
     * table (global setting) or we should avoid it but the ratio between
     * elements/buckets is over the "safe" threshold, we resize doubling
     * the number of buckets. */
    if (d->ht[0].used >= d->ht[0].size &&
        (dict_can_resize ||
         d->ht[0].used/d->ht[0].size > dict_force_resize_ratio))
    {
        return dictExpand(d, d->ht[0].used*2);
    }
    return DICT_OK;
}
실제로 _dictExpandIfNeeded 는 _dictKeyIndex 함수에서 호출하게 됩니다. 이렇게 테이블이 확장되면 Rehash를 해야 합니다. Rehash 라는 것은 테이블의 Bucket 크기가 커졌고 bitmask 가 달라졌으니… mask 0011이 전부 3번째 index였다면 이중에서 111은 7번째로, 011은 3번째로 옮기는 것입니다. 여기서 Redis의 특징이 하나 있습니다. 한꺼번에 모든 테이블을 Rehashing 해야 하면 당연히 시간이 많이 걸립니다. O(n)의 시간이 필요합니다. 그래서 Redis는 rehash flag와 rehashidx라는 변수를 이용해서, hash table에서 하나씩 Rehash하게 됩니다. 즉, 확장된 크기가 8이라면 이전 크기 총 4번의 Rehash 스텝을 통해서 Rehashing이 일어나게 됩니다. (이로 인해서 뒤에서 설명하는 특별한 현상이 생깁니다.)
그리고 현재 rehashing 중인것을 체크하는 함수가 dictIsRehashing 함수입니다. rehashidx 가 -1이 아니면 Rehashing 중인 상태입니다.
#define dictIsRehashing(d) ((d)->rehashidx != -1)
그리고 위의 _dictExpandIfNeeded 에서 호출하는 실제 hash table의 크기를 증가시키는 dictExpand 함수에서 rehashidx를 0으로 설정합니다.
/* Expand or create the hash table */
int dictExpand(dict *d, unsigned long size)
{
    dictht n; /* the new hash table */
    unsigned long realsize = _dictNextPower(size);

    /* the size is invalid if it is smaller than the number of
     * elements already inside the hash table */
    if (dictIsRehashing(d) || d->ht[0].used > size)
        return DICT_ERR;

    /* Allocate the new hash table and initialize all pointers to NULL */
    n.size = realsize;
    n.sizemask = realsize-1;
    n.table = zcalloc(realsize*sizeof(dictEntry*));
    n.used = 0;

    /* Is this the first initialization? If so it's not really a rehashing
     * we just set the first hash table so that it can accept keys. */
    if (d->ht[0].table == NULL) {
        d->ht[0] = n;
        return DICT_OK;
    }

    /* Prepare a second hash table for incremental rehashing */
    d->ht[1] = n;
    d->rehashidx = 0;
    return DICT_OK;
}
위의 함수를 잘 살펴보면 dict 구조체 안의 ht[1] = n으로 할당하는 코드가 있습니다. 이 얘기는 hash table이 두 개라는 것입니다. 먼저 dict 구조체를 살펴보면 다음과 같습니다.
typedef struct dictht {
    dictEntry **table;
    unsigned long size;
    unsigned long sizemask;
    unsigned long used;
} dictht;

typedef struct dict {
    dictType *type;
    void *privdata;
    dictht ht[2];
    long rehashidx; /* rehashing not in progress if rehashidx == -1 */
    int iterators; /* number of iterators currently running */
} dict;
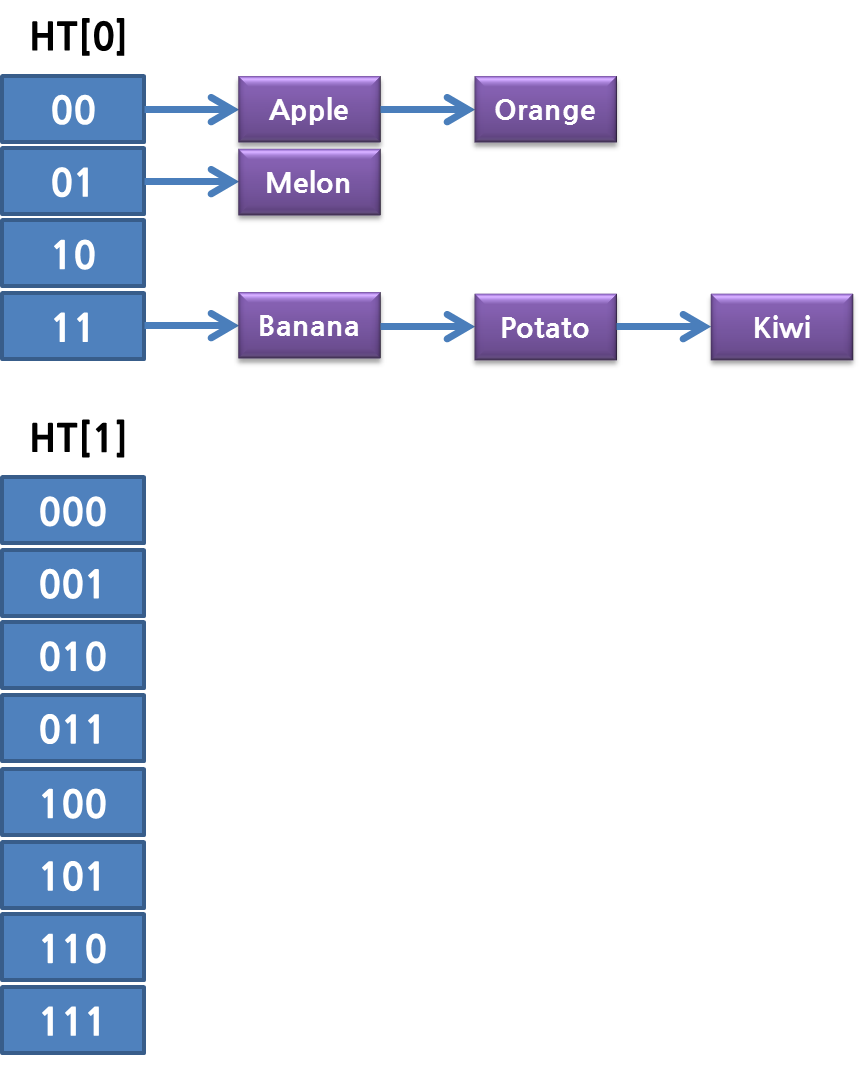
실제로, redis의 rehashing 중에는 Hash Table이 두개가 존재합니다. 이것은 앞에 설명했듯이… 한번에 rehash step이 끝나지 않고, 매번 하나의 bucket 별로 rehashing을 하기 때문입니다. 즉 hash table의 확장이 일어나면 다음과 같이 두 개의 hash table 이 생깁니다.
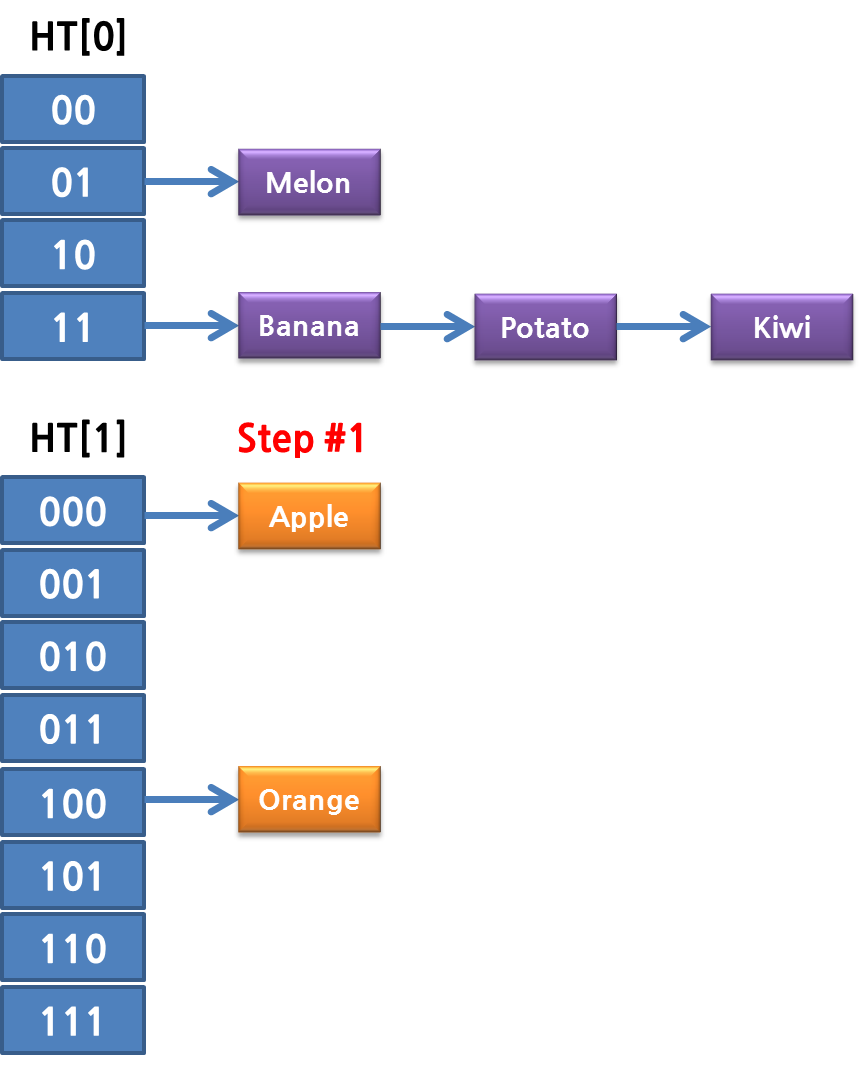
그리고 한스텝이 자나갈 때 마다 하나의 Bucket 단위로 해싱이 됩니다. 즉 첫번째 rehash step에서는 다음과 같이 ht[0]에 있던 데이터들이 ht[1]으로 나뉘어서 들어가게 됩니다.
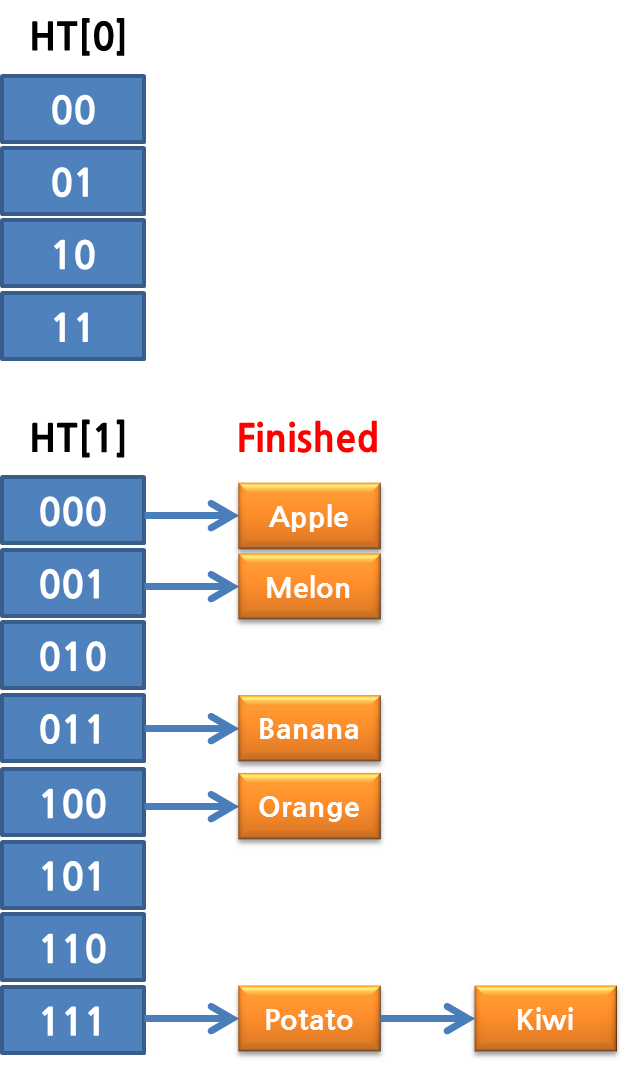
두 번째, 세 번째, 네 번째 rehash 스텝이 끝나면 완료되게 됩니다.
그럼 의문이 생깁니다. Rehashing 중에 추가 되는 데이터는? 또는 삭제나 업데이트는? 추가 되는 데이터는 이 때는 무조건 ht[1]으로 들어가게 됩니다.(또 해싱 안해도 되게…), 두 번째로, 검색이나, 업데이트는, 이 때 ht[0], ht[1]을 모두 탐색하게 됩니다.(어쩔 수 없겠죠?)
dictRehash 함수에서 이 rehash step을 처리하게 됩니다. dictRehash 함수의 파라매터 n은 이 스텝을 몇번이나 할 것인가 이고, 실제로 수행할 hash table의 index는 함수중에서 ht[0]의 table이 NULL인 부분을 스킵하면서 찾게 됩니다. 그리고 ht[0]의 used 값이 0이면 rehash가 모두 끝난것이므로 ht[1]을 ht[0]로 변경하고 rehashidx를 다시 -1로 셋팅하면서 종료하게 됩니다.
/* Performs N steps of incremental rehashing. Returns 1 if there are still
 * keys to move from the old to the new hash table, otherwise 0 is returned.
 * Note that a rehashing step consists in moving a bucket (that may have more
 * than one key as we use chaining) from the old to the new hash table. */
int dictRehash(dict *d, int n) {
    if (!dictIsRehashing(d)) return 0;

    while(n--) {
        dictEntry *de, *nextde;

        /* Check if we already rehashed the whole table... */
        if (d->ht[0].used == 0) {
            zfree(d->ht[0].table);
            d->ht[0] = d->ht[1];
            _dictReset(&d->ht[1]);
            d->rehashidx = -1;
            return 0;
        }

        /* Note that rehashidx can't overflow as we are sure there are more
         * elements because ht[0].used != 0 */
        assert(d->ht[0].size > (unsigned long)d->rehashidx);
        while(d->ht[0].table[d->rehashidx] == NULL) d->rehashidx++;
        de = d->ht[0].table[d->rehashidx];
        /* Move all the keys in this bucket from the old to the new hash HT */
        while(de) {
            unsigned int h;

            nextde = de->next;
            /* Get the index in the new hash table */
            h = dictHashKey(d, de->key) & d->ht[1].sizemask;
            de->next = d->ht[1].table[h];
            d->ht[1].table[h] = de;
            d->ht[0].used--;
            d->ht[1].used++;
            de = nextde;
        }
        d->ht[0].table[d->rehashidx] = NULL;
        d->rehashidx++;
    }
    return 1;
}
이제 다시 scan으로 돌아오면… Rehashing 중의 dictScan 함수는 다음과 같습니다.
    } else {
        t0 = &d->ht[0];
        t1 = &d->ht[1];

        /* Make sure t0 is the smaller and t1 is the bigger table */
        if (t0->size > t1->size) {
            t0 = &d->ht[1];
            t1 = &d->ht[0];
        }

        m0 = t0->sizemask;
        m1 = t1->sizemask;

        /* Emit entries at cursor */
        de = t0->table[v & m0];
        while (de) {
            fn(privdata, de);
            de = de->next;
        }

        /* Iterate over indices in larger table that are the expansion
         * of the index pointed to by the cursor in the smaller table */
        do {
            /* Emit entries at cursor */
            de = t1->table[v & m1];
            while (de) {
                fn(privdata, de);
                de = de->next;
            }

            /* Increment bits not covered by the smaller mask */
            v = (((v | m0) + 1) & ~m0) | (v & m0);

            /* Continue while bits covered by mask difference is non-zero */
        } while (v & (m0 ^ m1));
    }
실제로 이미 Rehashing이 된 bucket의 경우는 ht[0] 작은 hash table에는 이미 index의 값이 NULL이므로 실제로 돌지 않지만, 아직 rehash되지 않은 bucket의 경우는 ht[0] 와 ht[1] 의 두 군데, 즉 총 세 군데에 데이터가 존재할 수 있습니다. 그래서 먼저 ht[0]의 bucket을 돌고 나서, ht[1]을 찾게 됩니다. 여기서 당연히 ht[1]에서는 두 군데를 검색해야 하므로 두 번 돌게 됩니다.
v = (((v | m0) + 1) & ~m0) | (v & m0);
즉 위의 식은 만약 v가 0이고 m0 = 3, m1 = 7이라고 하면… (((0 | 3) + 1) & ~3) | (0 & 3) 이 되게 됩니다. ~3은 Bitwise NOT 3이 되므로 -4 가 나오고, (4 & -4) | 0 이므로 결론은 4 & -4 입니다. 3은 00000011, bitwise NOT하면 11111100 이 되므로, 즉 다시 풀면, 00000100 & 11111100 해서 00000100 즉 4가 나오게됩니다. 처음에는 index 0, 두번째는 index 4 가 되는 거죠. 그래서 첫 루프를 돌게 됩니다. 다시 4 & (m0 ^ m1) == 4 이므로 …
이제 두 번째 루프에서 다시 (((4 | 3) + 1) & -4) | (4 & 3) 이므로… 4 | 3 = 7, 4 & 3 = 0 이므로… 다시 한번 정리하면 ((7+1) & -4) | 0 이므로 결론은 8 & -4 = 4 가 되므로 00001000 & 111111100 이 되므로 v 는 이번에는 00001000 즉 8이 됩니다. 즉 한번 돌 때 마다, ht[0]의 size 만큼 증가하게 됩니다.(다들 한방에 이해하실 텐데… 이걸 설명한다고…) 그래서 그 다음번에는 8 & 4 가 되므로 루프가 끝나게 됩니다. 즉, 0, 4 이렇게 ht[1]에서 두 번 읽어야 하니, 두 번 읽는 코드를 만들어둔거죠.
이제 다음편에는 cursor 가 어떻게 만들어지는가에 대해서 간단하게 설명하도록 하겠습니다. (다음편은 짧을듯…)
